If you’re wondering when last you interacted with an Open Source Operating System (OS), let us be the ones to tell you, it was today. It was when you unlocked your android phone, drove your car, or saved something on your hard drive. The one aesthetically pleasing picture you took for our profile pictures is also rooted in an OS called Linux. If you are interested in web design or web development, then you probably eat, breathe and drink Linux. Steps to install Linux Operating System is detailed below.
Linux was created by Linus Torvalds while he studied at the University of Helsinki in 1991. Torvalds originally intended to name the OS “Freax”, and if we’re honest, that would’ve been brilliant.
Similar to Windows and iOS, Linux uses graphical user interface and word processing apps. The differences, however, are more crucial in this comparison. The first difference is that Linux is freely available, not only for use but also for editing and contributing (with the required skill set). More importantly, Linux is the most customizable OS available to the general public. While the core remains the same, there are various software options and multiple distributions (commonly known as “distros”) available.
Install Linux Operating System
Time needed: 12 minutes
There is a variety of versions of Linux available to install and use. The following guide will walk you through the steps to install any version of Linux. If you are to choose a specific version of Linux, such as Linux Mint, Ubuntu Linux, or Fedora, the steps to be taken would differ for each.
- Download Linux
Choose a Linux Distribution and download it. Multiple websites offer the file for download, and if you choose a particular distribution, you can find the ISO format for download on the distribution website. An ISO Format file must be burned onto a CD or USB stick before it can be used to install Linux to the computer.
Most systems have a built-in image burning tool, in case yours doesn’t, you can download one and use it to burn the ISO format onto a CD.
To burn the file onto a USB stick, you would need a tool such as UNetBootin (see image below) or Pen Drive Linux. These tools are also easy to access and download.
- Boot Linux in CD or USB Stick
To successfully boot into your CD or USB Stick, you will have to make some changes in settings, so as to stop a default boot into the hard drive.
Reboot your computer, and press the key to enter the boot menu. In most systems this key is displayed onscreen with the manufacturer’s logo, and falls within Del, F2, or F12.
These instructions will differ from one OS to the other. If your computer doesn’t give you direct access to the boot menu, you may need to manoeuvre your way to the BIOS menu.
Once you enter the menu, select your live CD or USB. Change the settings, save, exit and allow your computer to finish the boot process. - Live Enviroment Setup Of Linux
You have the option to try the “live environment” of your Linux distribution, to see how it works with your system, and how you feel about it. If you try it, you can launch the installation process from the desktop itself. In the case that you choose to not try the distribution, the boot menu is your friend yet again. Launch from the boot menu and configure certain basic settings such as keyboard layout, time zone, and language.
- Create Login Details
Create login details to install Linux. The same details will be needed at a later point to access your administrative tasks.
- Dual Boot Of the System
This step is extremely crucial to the successful completion of this process. If you intend dual booting your system with Linux and your original OS, you will need to create a partition in your hard drive for Linux. You can skip this step if you do not intend on dual booting and will be using an entirely Linux system.
A dual boot system is when two operating systems exist simultaneously on one computer and the user has a choice every time the computer is booted. Every time the computer is turned on, the boot manager will display a menu and present the user, you, with a choice.
Some distributions come with a recommended partition set automatically. This partition can be manually adjusted, and will require you to leave 20GB for the OS itself and addition space for any other programs and files you may create.
If the partition isn’t automatically made, ensure that the partition you make is in the Ext4 format. - Reboot The Computer
Once you complete the installation, the computer will reboot, and then display a screen where you can choose your new Linux distribution. This screen is called the GNU GRUB, and is the boot loader for Linux installations. Hitting shift after the manufacturer splash screen can guide you to this screen if it doesn’t come up automatically.
- Check the Hardware with Linux
Check the hardware. With Linux installations, while most hardware works right off the bat, you may need to download drivers for some. Often the issue is with the graphics cards, there are generally open source drivers that will solve your issues and are easily available.
- Ready to Go
Once you have checked your hardware and completed the installation process, you’re ready to start using your Linux system. Many programs will come pre-installed, if you are missing out on any, you can locate them in the respective repositories.
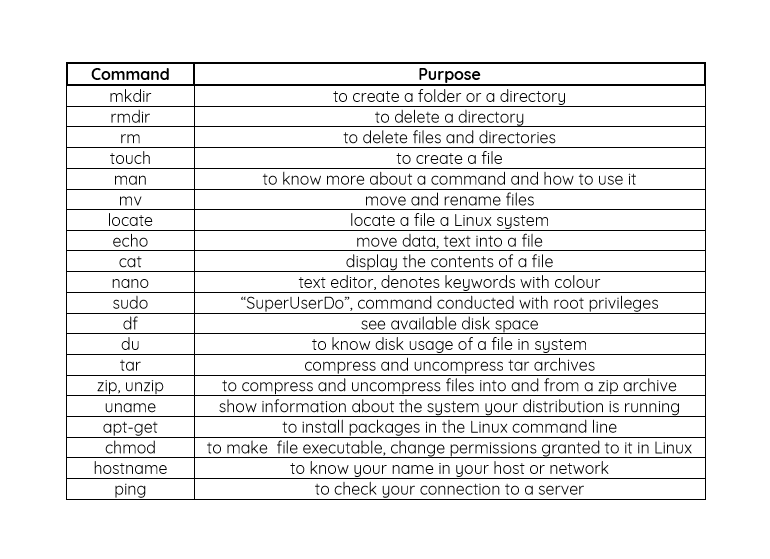
Linux Commands
Linux has a large number of applicable commands, which would be a challenge to list. So, we have decided to explain 5 basic commands and attach a List with the action of it.
When using Linux in a server, you require a shell or terminal. A shell is a program that receives and relays commands from users to the OS and then shows the output. Below is the list of Polpular commands used in Linux.
Basic Commands
- pwd: When you first open a terminal you are in the directory of the user. To find which directory you are in, you use this command. It provides the path all the way to the root (the base of the Linux file system). This output will display as “/home/username”.
- 1s: Once you identify which directory you are in, this command can help you identify what files are in the directory you are in. Even hidden files can be seen using “1s-a”
- alias: This command allows you to set up your own name for any other command, or sequence of commands. For instance, you can set up “cls” as your alias command for “clear”.
- cd: With this command, you can go to a certain directory. For instance, if you are in the home folder, and you wish to go to the downloads folder, the command you give would be “cd Downloads”. This command is case sensitive.
- cp: Copying files through the command line is conducted using this command.
Linux Installation
Now, this is all about Linux installation and enviornment. There are some of the Popular Linux distributions as Debian, Fedora and Ubuntu. Ubuntu is popular among all of them and mostly used. Selecting the best distribution of Linux is difficult as they are made for specific task. To install Linux the recommended virtual hard disk size is 8GB, you can config to your own.